Git and Github basics: A Beginner's Guide

I am a Frontend developer with 3+ years of professional experience in the React.js, Next.js, and Typescript ecosystem. I have developed a strong skillset in writing beautiful and functional user interfaces. My expertise also extends creating visually appealing designs using raw CSS and frameworks like TailwindCSS.
Welcome to the introduction to Git and Github. This guide will cover the basics of Git and Github, setting them up and how to use them. This guide was made for the Codeskills developer community, if you’re just getting started in tech or you want a community of like-minded developers, Join our community. Okay, let’s get started!
Pre-requisites
To follow along with this guide, you will need the following:
An active internet connection
A code editor: I recommend VScode (Download here). It comes with an in-built terminal that will be used throughout this guide.
To toggle open the terminal:
Ctrl + `
Read more on VSCode terminal: https://code.visualstudio.com/docs/terminal/basics
All commands will be typed out in the terminal
What is Version control?
Imagine you're building something super cool on your computer, like a website, or even a game. As you work on it, you make lots of changes to make it better and better. But here's the thing: sometimes, you might want to go back to how it looked or worked before, like if you accidentally make a mistake or if you want to compare it to your earlier work.
This is where "version control" comes to the rescue! Version control is like having a magical time machine for your projects. It lets you keep track of every change you make and allows you to jump back to any previous version whenever you want.
Why is Version control important to you?
You might be wondering, "Why is version control important for web development or any other project?". Here are a few reasons:
1. Backup and Safety: Version control acts as a safety net. If something goes wrong, like you delete a part of your project by mistake, you can easily bring it back. It's like having a copy of your project at every stage.
2. Collaboration: Imagine you and your friends are working on a big project together, like building a treehouse. With version control, everyone can work on their part, and the magical time machine makes sure all your changes fit together perfectly.
3. Tracking Changes: Version control helps you see exactly what changed in your project and who made those changes. It's like having a diary that tells you everything that happened.
4. Experimentation: You can try out new ideas without worrying about messing up your project. If you don't like the new idea, just hop back to the previous version.
5. Learning and Improvement: Version control lets you see how your project evolves. It's a great way to track your progress and get better at what you're doing.
So, in a nutshell, version control is like a superhero sidekick for web developers (and anyone else working on projects). It keeps everything organized, and safe and makes teamwork super smooth. It's one of the first tools you'll want to learn when diving into the amazing world of web development!
We will be using Git as our Version control software. Let's get started with installation.
Why use Git for version control?
Now, you might wonder, "Why should I bother with Git when I can save copies of my project files on my computer?" Here's why Git is a game-changer:
Efficiency: Git is super efficient. It doesn't store duplicate copies of your entire project for every change. Instead, it records the differences between snapshots. This saves space and makes Git lightning-fast.
Backup Plan: Git serves as a backup plan. If your computer crashes or your files get lost, your Git repository on another computer or in the cloud has your back.
Global Access: With Git, your project is accessible from anywhere in the world. You can work on it from your computer at home, your friend's computer, or even on a sunny beach with internet access.
Community: Git has a massive fan club. Millions of developers around the world use it. If you get stuck or need help, there's a friendly community (like [codeskills]) ready to lend a hand.
Setting Up Git
Alright, now that you're excited about Git, let's set it up! It's not hard, and you'll be up and running in no time:
Step 1: Install Git
Download and install the appropriate Git version for your operating system from git-scm.com.
After installation, open the Terminal and type
git --versionto check.

Step 2: Configure Git
Open a command prompt or terminal.
Set your name by typing:
git config --globaluser.name"Your Name".Set your email by typing:
git config --globaluser.email"youremail@example.com".Set your default branch name to “master” by typing:
git config --global init.defaultBranch master
That's it! You've got Git up and running on your computer. Now, you're ready to start using Git to keep your projects safe, organized, and ready for any creative adventure.
Basic git commands
Before you move forward, Here are some of the basic git commands and what they do:
git init
Imagine you're starting a new project. Before you write anything, you need a clean canvas. git init is like waving a magic wand and saying, "This folder is now a magical Git canvas." It transforms a regular folder into a place where Git can work its version control magic.
How to Use It: Open your computer's terminal, navigate to the folder where your project will live, and type git init. Boom! Your project is now ready for Git.
git add
So you've written some fantastic code. But Git doesn't know about it yet. That's where git add comes in. It's like telling Git, "Hey, pay attention to these changes. I want you to remember them."
How to Use It: After you've made changes to your project, type git add [name of files] add the names of the files you want Git to notice (use **git add .** if you want to add all files at once). It's like saying, "Git, check out these awesome updates!"
git commit
Imagine you've completed a whole section of your website or finished painting a beautiful landscape. git commit is like saying, "This is a big milestone. Let's save it forever!" It takes all the changes you've added with git add and makes a permanent record of them.
How to Use It: After you've added your changes, use git commit -m "Your descriptive message" to create a snapshot with a message explaining what you did. It's like adding a caption to your masterpiece. Note: every commit requires a message.
git status
If you ever wonder, "What's going on with my project?" git status is like checking the status of your project. It tells you which files have changes that haven't been added or committed yet. It's your project's personal update assistant.
How to Use It: Type git status in your terminal, and Git will reveal the secret changes waiting to be added or committed.
git log
What It Does: Remember how Git is like a detective? git log is your detective's notebook. It shows you a list of all the snapshots (commits) you've made. You can see who made them, when, and the messages they left behind.
How to Use It: Just type git log in your terminal, and Git will spill the beans on your project's history.
git diff
Sometimes, you want to see what's different between two snapshots (commits). git diff is like a magnifying glass that highlights the changes. It helps you understand exactly what you've added, removed, or changed.
How to Use It: To compare changes between the current version and a previous one, type git diff. You can also specify two commits to compare like git diff [commit1] [commit2].
Git Basics in Action*
This section will walk you through the setup process for a mini project of a superhero comic as a practical example of Git.
Step 1: Initialize a Git Repository (git init)
Navigate to your project folder and open it up in VSCode where you want to create your Git project. Open your terminal and run the following command to initialize a Git repository: git init. This command sets up a new Git repository in your project folder.

Step 2: Create and Edit Files
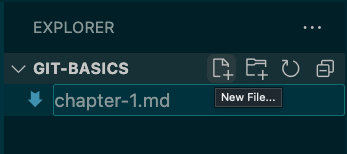
Now, create your project files. These will be the changes we track with Git.
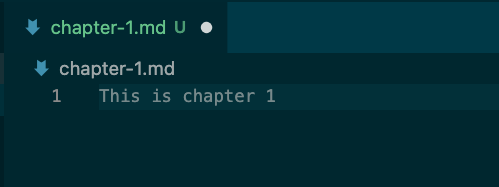
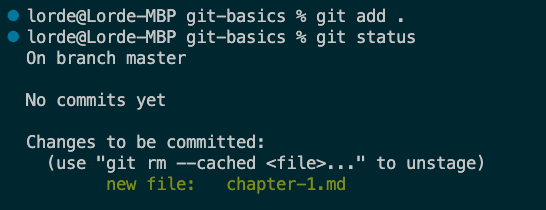
For example, let's create a new file called chapter-1.md and add some content to it.
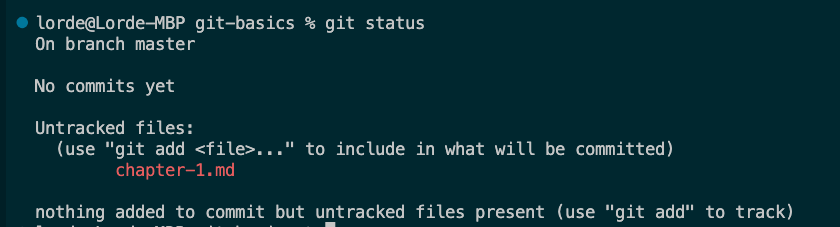
Step 3: Check the Status (git status)
To see which files Git is aware of and which changes need to be committed, run: git status
Git will show you the untracked or modified files.
Step 4: Stage Changes (git add)
To tell Git to start tracking your changes, you need to stage them. Stage your changes using: git add .
This tells Git to track all the changes in the current directory (the .).
Step 5: Create a Commit (git commit)
Now, commit your staged changes with a descriptive message using: git commit -m "Initial commit"
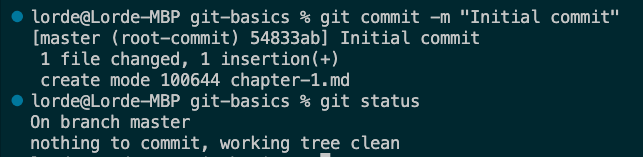
This takes a snapshot of your project's current state. The next concept you'll be learning is Branching in Git.
What is Branching?
Let’s imagine you're working on your project (for example purposes let’s say it is a superhero comic book). You've got your main storyline, but suddenly, you want to explore a new side plot without messing up your main story. This is where "branching" in Git comes into play.
Branching is like creating a parallel universe for your project. It allows you to work on new ideas, features, or fixes without affecting your main project timeline (The “master” branch). Think of it as writing an exciting side story while your main story remains intact.
Checking the current branch (git branch)
You want to check the current branch you are on and type git branch. This will return a list of all branches available and the current branch will be highlighted
Creating Branches (git branch [branch-name])
You want to start working on that side plot, right? To do that, you create a new branch. A branch is like a separate copy of your project where you can make changes independently.
How to Use It: In your terminal, type git branch [branch-name]. This creates a new branch with the name you specify. For example, git branch new-feature creates a branch named "new-feature." But wait, the new branch doesn't become the main one yet. It's like opening a new comic book with a different storyline.
Switching Branches (git checkout)
Now that you have your new branch, you need to jump into that parallel universe and start drawing your side plot. You switch branches to work on the new storyline.
How to Use It: Type git checkout [branch-name] in your terminal. For instance, git checkout new-feature transports you to the "new-feature" branch. Now, any changes you make will be in this universe, separate from the main story (The “master” branch).
Merging Branches (git merge)
After you've drawn your side plot and it's ready to become part of the main story, you need to merge it back into the main branch. Merging combines the changes from one branch into another.
How to Use It: First, make sure you're in the main branch (use git checkout master). Then, type git merge branch-name (e.g., git merge new-feature). Git will magically blend the two storylines.
Branching and Merging in Action*
Let's see this in action with a practical example:
Create a New Branch: You're in the main storyline (
masterbranch). Usegit branch chapter-2to create a new branch for your side plot.
Switch to the New Branch: Use
git checkout chapter-2to jump into the side plot universe.
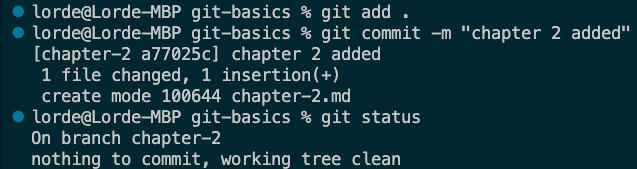
Work on Your Side Plot: Make changes and write dialogue related to your side plot.
Create a
chapter-2.mdand add the content "This is chapter 2"Check the
git status
Add and commit your changes
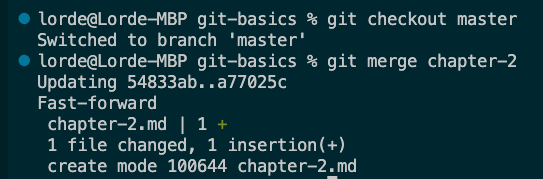
Switch Back to Main: Once your side plot is complete, switch back to the main storyline with
git checkout master.Merge the Side Plot: Now, merge your side plot into the main story with
git merge chapter-2. Your side plot now becomes part of the main story.
That's branching and merging in a nutshell! It's like having multiple storylines in your comic book, and Git helps you weave them together seamlessly. Whether you're adding new features, fixing bugs, or exploring creative ideas, branching keeps your main project safe and organized. It's one of Git's superpowers! In the next section, you'll be learning about using Remote repositories in Git.
What is a Remote Repository?
Okay, so you've been working on your superhero comic book in your secret space (your local Git repository), making changes, and creating new chapters. But what if you want to share your masterpiece with the world or collaborate with others?
That's where a remote repository comes in. Think of it as a high-security vault where you can store your project so that others can see it, contribute to it, or even make copies.
In this guide, we will be focusing on GitHub as our remote service provider
Adding a Remote (git remote add)
What It Does: To connect your local Git repository to a remote one (like GitHub), you need to add a remote. This tells Git where your project should be stored and shared.
How to Use It: Use the command git remote add name-of-remote url-of-remote to add a remote. For example: git remote add origin <https://github.com/your-username/your-repo.git\>
Here, origin is just a common name for the default remote, and url-of-remote is the web address of your remote repository.
Pushing Changes to a Remote (git push)
What It Does: Imagine you've created some fantastic new additions for your project in your local Git repository, and you want the world to see them. Pushing is like sending those new additions to your remote repository so others can view and admire your work.
How to Use It: After you've made your local changes, use git push remote-name branch-name to send your changes to the remote. For example: git push origin master
This sends the changes in your local master branch to the origin remote.
Pulling Changes from a Remote (git pull)
What It Does: Now, imagine other collaborators are also working on your project in the remote repository. To see their changes and incorporate them into your own local project, you need to pull their changes into your local repository.
How to Use It: To fetch and merge changes from the remote, use git pull remote-name branch-name. For example: **git pull origin master**
This fetches the changes made by others in the master branch of the origin remote and merges them into your local branch.
Cloning a Remote Repository
What It Does: Let's say you discover an amazing project online (a remote Git repository) and you want to have your copy to work on or admire. Cloning is like making an identical copy of that project in your own space (local repository).
How to Use It: To clone a remote repository, use git clone url-of-remote. For example: **git clone <https://github.com/username/project-repo.git**\>
This creates a local copy of the remote repository, including all its components (like code, image and more.)
Working with remote repositories is like sharing your project with the world and joining forces with other collaborators. It's how you collaborate, showcase your work, and create amazing projects together. Now, you're ready to connect, share, and explore the vast universe of Git!
In the next section, You will learn more about Github in depth.
What is GitHub?
GitHub is a web-based platform designed for hosting and collaborating on software development projects using Git. It's like an art gallery and a workshop combined. You can display your projects, work on them with others, and contribute to open-source projects from all over the world.
How to Create a GitHub Account
Visit GitHub: Go to GitHub in your web browser.
Sign Up: Click the "Sign Up" button.

Fill Out the Form: Provide your username, email address, and password. Make sure to choose a unique username—it's your artist name on GitHub!
Verify Email: GitHub will send you an email to verify your address. Click the link in the email to confirm your registration.
Welcome to GitHub: You're in! Welcome to the GitHub community. You now have a virtual artist's studio.
Connecting your Github account to your local computer
To use remote repositories locally on your computer, you need to log into your GitHub account. The process is not the most straightforward so you need to follow the video guide very carefully to ensure you get it right.
Watch this video here: https://www.youtube.com/watch?v=kHkQnuYzwoo
Setting up remote repositories in action*
Video guide: https://youtu.be/0spDDc9ZMGE
Step 1: Create a GitHub Repository
Log in to your GitHub account.
Click the "+" sign in the top right corner and select "New Repository."
Fill in the repository name, choose visibility (public or private), and add an optional description.
Click "Create repository."
Step 2: Link Your Local Repository to the Remote Repository
Now, you'll link your existing local repository to the remote repository you created on GitHub.
In your terminal or Git Bash, navigate to the root directory of your local repository (use
cdto change directories).Check the current remote repositories associated with your local repository using:
git remote -vYou'll likely see that there are no remote repositories configured.
Link your local repository to the remote GitHub repository you created. Replace
your-usernameandyour-repowith your GitHub username and the name of your GitHub repository.git remote add origin <https://github.com/your-username/your-repo.git\>Verify that the remote has been added correctly:
git remote -vYou should see the URL of your GitHub repository listed as
origin.
Step 3: Push Your Local Repository to GitHub
Now that your local repository is connected to the remote repository on GitHub, you can push your code to GitHub.
Push your code to GitHub using:
git push -u origin masterThis command pushes your local
masterbranch to the remoteorigin(your GitHub repository). The-uflag sets up a tracking relationship between your localmasterand the remoteorigin/master, so you won't need to specify the branch in future pushes.You'll be prompted to enter your GitHub username and password (or use an access token if you have one) to authenticate. This step will be skipped if you follow the tutorial video on setting up Github locally (link: https://www.youtube.com/watch?v=kHkQnuYzwoo)
Step 4: Check Your GitHub Repository
Go back to your GitHub repository in your web browser. You'll see the content of your local repository now reflected in the remote repository on GitHub.
Congratulations! You've successfully pushed your existing local Git repository to a remote repository on GitHub, enabling collaboration and version control in a shared environment.
In the next section, you will learn more about Collaborating with Git and GitHub. You will go through process of forking a remote repository, making changes, committing those changes, pushing those changes to Github and making a Pull Request.
Forking Repositories & Making Pull Requests
Step 1: What is Forking?
Forking is like making a copy of a project (repository) that someone else created. You copy it to your o GitHub account so you can work on it without changing the original project.
Step 2: Fork a Repository
Visit the Repository: Go to the GitHub page of the repository you want to fork. It might be a project, a tutorial, or anything else you're interested in.
Find the Fork Button: In the top right corner, you'll see a "Fork" button. Click it.
Choose Your Account: A window will pop up, asking where you want to fork the repository. Choose your own GitHub account.
Fork It: GitHub will create a copy of the repository in your account. You'll see it listed under your repositories.
Step 3: What is a Pull Request?
A pull request is like raising your hand and saying, "I've made some changes to the project, and I'd like the owner to consider them." It's how you ask the original project owner to include your changes.
Step 4: Make a Pull Request
Create a New Branch: Before you make changes, create a new branch in your forked repository. This keeps your changes separate from the original project.
git branch my-featureand switch to the New Branch
git checkout my-featureMake Changes: Work on your new feature or updates in this branch. Once you're satisfied with your work, commit your changes.
git add .git commit -m "Add my feature"Push Changes: Push your changes to your forked repository on GitHub.
git push origin my-featureCreate a Pull Request: Go to your forked repository on GitHub. You'll see a banner indicating the branch you've pushed. Click the "Compare & pull request" button.
Describe Your Changes: Give your pull request a title and describe the changes you made. Why did you make these changes? What problem do they solve?
Create Pull Request: Click the "Create pull request" button. GitHub will send your request to the original repository's owner.
Reviewing Pull Requests
Step 5: What is Reviewing?
When someone else sends a pull request to your project, or you send one to theirs, reviewing is how you look at the changes and discuss them.
Step 6: Review a Pull Request
Access the Pull Request: If someone sends a pull request to your repository, you'll receive a notification. Click on the pull request to access it.
Review Changes: GitHub provides a user-friendly interface to see the changes. You can leave comments, suggest improvements, or have discussions right in the pull request.
Approve and Merge: If you're satisfied with the changes, you can approve the pull request and merge it into the original repository.
Close the Loop: Once the pull request is merged, it becomes part of the original project. You can close the pull request and celebrate the successful collaboration!
Collaborating on GitHub is like working on a project with friends. You can copy and work on projects, suggest improvements, and make amazing things together. Now, you're ready to start collaborating on GitHub with confidence!
Making a Pull Request in Action*
Step 1: Fork the Repository
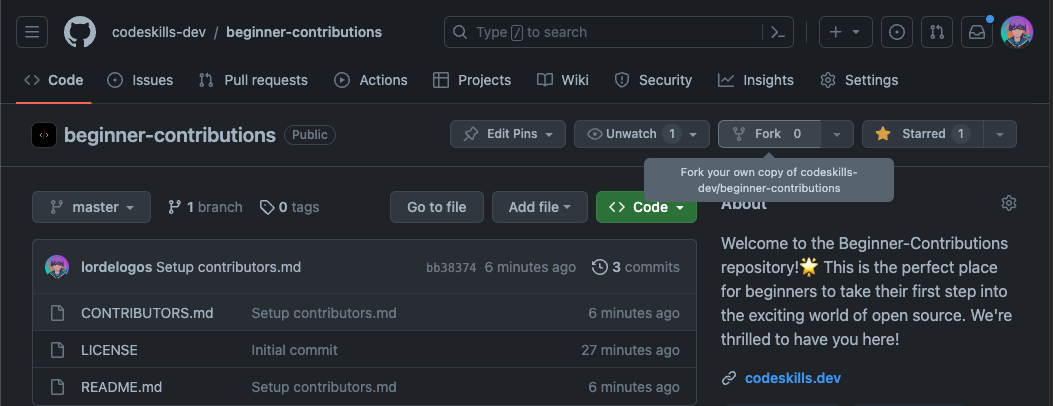
Visit the GitHub repository you want to contribute to. In this case, visit https://github.com/codeskills-dev/beginner-contributions
Click the "Fork" button in the top-right corner of the repository's page. This creates a copy of the repository in your own GitHub account
Step 2: Clone Your Fork Locally
Now, you'll clone your forked repository to your local machine.
Copy the URL of your forked repository from your GitHub account (e.g.,
https://github.com/your-username/beginner-contributions.git)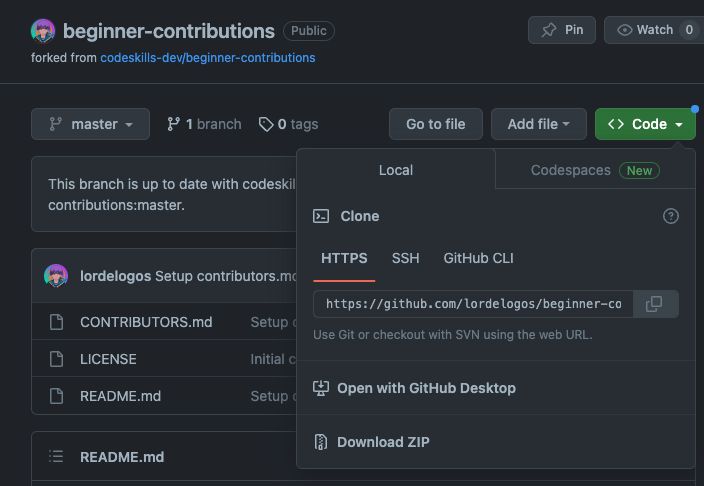
Open your VSCode terminal or Git Bash.
Navigate to the directory where you want to clone the repository using
cd.Run the following command to clone the repository:
git clonehttps://github.com/your-username/beginner-contributions.gitReplace the URL with the actual URL of your forked repository.

git cloneStep 3: Make Changes Locally
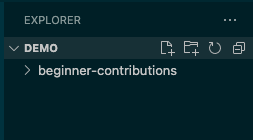
Navigate to the cloned repository using
cd beginner-contributions
Create a new branch to work on your changes. This keeps your changes separate from the
masterbranch:git branch user-usernameand Switch to the New Branchgit checkout user-usernameNote: replace “username” with your github username (in my case,
user-username)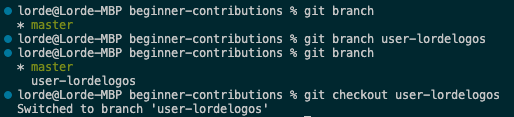
Make your desired changes to the files within the repository. For example, add your username to the
CONTRIBUTORS.mdfile
Stage your changes using
git add .to stage all changes orgit add filenameto stage specific filesCommit your changes with a descriptive message:
git commit -m "Added username to CONTRIBUTORS"
Step 4: Push Changes to Your Fork
Now, you'll push your changes to your forked repository on GitHub. git push origin user-username
Replace user-username with the name of the branch you created earlier

Step 5: Create a Pull Request
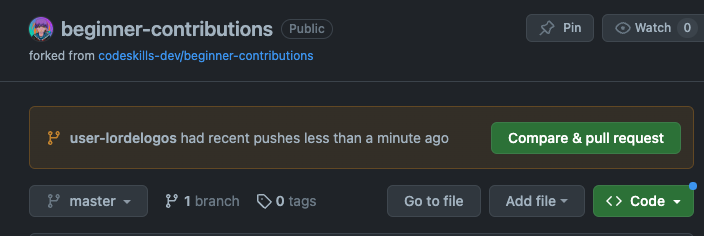
Go to your forked repository on GitHub in your web browser.
You'll see a banner indicating the branch you've just pushed. Click the "Compare & pull request" button
Describe your changes in the pull request and provide context. Explain what you've done.
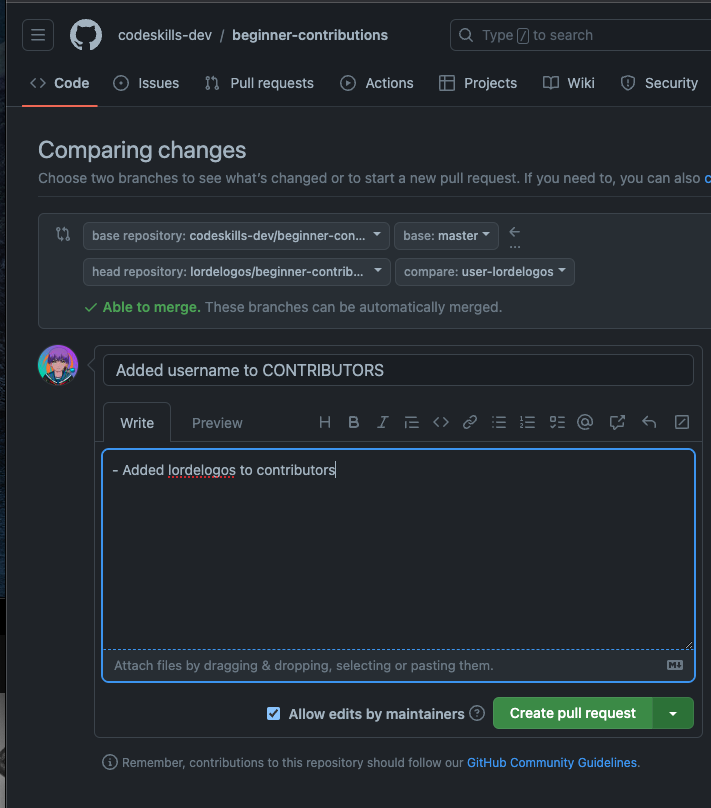
Click the "Create pull request" button.
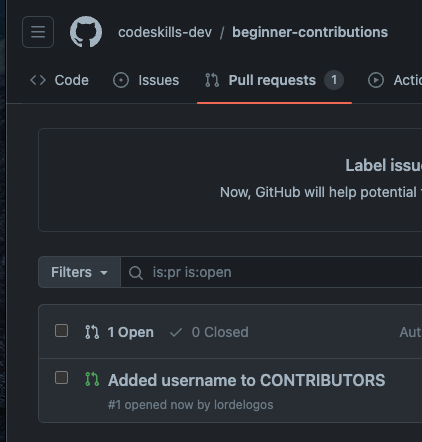
Step 6: Review and Merge
The maintainers of the original repository will be notified of your pull request. They will review your changes, provide feedback, and potentially merge them into the main project.
That's it! You've successfully forked a repository, made changes, and created a pull request to contribute those changes back to the original repository on GitHub. Your contributions are now in the hands of the project maintainers for review and potential inclusion in the project.
Now you know the basics of working with Git and GitHub, you will learn some additional commands that can help your workflows on Git.
Deleting Branches with git branch -d
What is Deleting a Branch?
In Git, a branch is like a parallel universe where you make changes to your project. When you're done with a branch and want to clean up your workspace, you can delete a branch. It's like closing a chapter in your story.
Using git branch -d
Deleting a Local Branch: To delete a local branch (a branch on your computer), use the
git branch -d branch-namecommand. For example:git branch -d feature-branchThis deletes the
feature-branchlocally.Deleting a Remote Branch: If you want to delete a branch on the remote repository (like GitHub), you'll need to use a slightly different command. Run:
git push origin --delete remote-branch-nameReplace
remote-branch-namewith the name of the branch you want to delete on the remote.
Temporarily Saving Changes with git stash
What is Stashing?
Imagine you're in the middle of working on a new feature, but your boss suddenly asks you to fix an urgent bug. You don't want to lose your unfinished work, so you stash it away like putting your unfinished artwork in a drawer while you address the urgent issue.
Using git stash
Stash Changes: To stash your changes, use the
git stashcommand:git stashYour changes are now temporarily saved, and your working directory is clean.
Retrieve Stashed Changes: When you're ready to continue working on your stashed changes, use:
git stash applyThis will apply the latest stash. If you have multiple stashes, you can specify which one to apply.
List Stashes: To see a list of your stashes, use:
git stash listClear Stashes: To remove a stash (for example, after you've applied it), use:
git stash drop stash-name
Unstaging Changes with git reset
What is Unstaging?
Sometimes, you accidentally stage changes (add them to the next commit) that you didn't intend to. Unstaging is like taking those changes off the stage, so they won't be part of the next commit.
Using git reset
Unstaging a File: To unstage a file, use the
git reset filenamecommand. For example:git reset file-to-unstage.jsThis removes the file from the staging area.
Unstaging All Files: If you've staged multiple files and want to unstage them all, use:
git resetThis untracks all staged changes.
Unstaging to a Specific Commit: You can also use
git resetto move your branch pointer to a specific commit, effectively uncommitting everything after that commit. Be cautious with this, as it rewrites history.
These additional Git commands provide you with more control over your Git workflow. Whether you're cleaning up branches, stashing changes, or unstaging files, they help you manage your project efficiently. Now, you have a deeper understanding of these Git commands to enhance your version control skills!
In the Next section, you will learn some good practices to follow when using Git.
Best Practices when using Git
Commit Messages: The Art of Good Communication
Be Descriptive: Write clear and concise commit messages that explain what the commit does. A good format is "Verb (present tense): Description."
Example:
Add login functionality: Implement user authenticationUse Present Tense: Write in the present tense ("Add," "Fix," "Update") to describe the action taken by the commit.
Keep It Short: Avoid long, rambling commit messages. Aim for 50 characters in the subject line and a more detailed explanation in the body if necessary.
Example:
Subject:
Fix navbar stylingBody:
Resolved a styling issue with the navigation bar on small screens.
Reference Issues: If your commit relates to a specific issue or ticket in your project management system (e.g., GitHub Issues), include a reference to it.
Example:
Fix #123: Address bug in search functionality
Using .gitignore
Managing Untracked Files: The .gitignore File
The .gitignore file specifies files or directories that Git should ignore, ensuring they won't be tracked or included in your repository. Common entries include sensitive information.
Create a
.gitignoreFile: In your project's root directory, create a file named.gitignore. List the patterns of files or directories you want to exclude. For example:# Ignore IDE-specific files .vscode/ .idea/ # Ignore sensitive information .envCommit
.gitignore: Make sure to commit and push your.gitignorefile to share it with your team.
READ MORE: https://git-scm.com/book/en/v2/Git-Basics-Recording-Changes-to-the-Repository#_ignoring
In the next section, you will learn how to handle some of the most common errors you will face when starting out with Git and GitHub
Handling Errors and Issues Beginners Commonly Face
"No Git Command Found" Error
Issue: You've installed Git, but the system doesn't recognise Git commands.
Solution: Verify Git is installed correctly. Ensure it's added to your system's PATH variable.
"Permission Denied" or "Access Denied" Error
Issue: You're trying to perform an action (like pushing) but don't have the necessary permissions.
Solution: Make sure you have the appropriate permissions on the repository, and that your credentials are correctly set up.
Merge Conflicts
Issue: You're trying to merge branches, but Git identifies conflicting changes.
Solution: Open the files with conflicts, resolve them manually, and commit the changes.
"Changes Not Staged for Commit" Message
Issue: Git is indicating that you have modified files that haven't been staged.
Solution: Use
git addto stage the changes before committing.
"Changes to be Committed" Message
Issue: Git is indicating that there are staged changes ready to be committed.
Solution: Proceed with the commit using
git commit.
"Commit Aborted: No Commit Message" Error
Issue: You attempted to commit without providing a commit message.
Solution: Ensure you add a meaningful commit message using
git commit -m "Your message".
"Repository Not Found" Error
Issue: Git can't find the repository, possibly due to an incorrect URL.
Solution: Double-check the repository URL and your internet connection.
"Repository Already Exists" Error
Issue: You're trying to create a repository with the same name as an existing one.
Solution: Choose a different repository name or delete the existing repository.
"Detached HEAD" State
Issue: You're in a state where HEAD is pointing to a specific commit instead of a branch.
Solution: Create a new branch from the current commit using
git checkout -b new-branch-name.
"File is Too Large" Error
Issue: You're trying to push a file that exceeds the repository's size limit.
Solution: Use
.gitignoreto exclude large files or consider using Git Large File Storage (LFS).
"Repository is Out of Date" Message
Issue: Your local repository is behind the remote repository.
Solution: Use
git pullto update your local repository.
Remember, encountering issues is a natural part of using Git. The key is to approach them methodically, understand the error messages, and use the appropriate Git commands or adjustments to resolve them. If you're ever stuck, don't hesitate to seek help online, from the Codeskills community or in Git forums.
Additional resources
[PDF] Git Cheat Sheet (https://education.github.com/git-cheat-sheet-education.pdf): GitHub offers a printable Git cheat sheet that summarizes common Git commands and concepts. It's handy to have on your desk.
Git Documentation (https://git-scm.com/doc): The official Git documentation is comprehensive and can be a great reference as you become more familiar with Git.
GitHub Documentation (https://docs.github.com/en/get-started): The official GitHub documentation is very detailed and can help you with any issues you face on GitHub
[VIDEO] Git Tutorial for Absolute Beginners: https://www.youtube.com/watch?v=CvUiKWv2-C0
Join Our Growing Community!
Congratulations, you've taken your first steps into the world of Git and GitHub! We hope this guide has been a helpful resource on your journey.
But remember, learning is a continuous adventure, and the best way to grow is by being part of a supportive community. Join our community of beginners and experienced developers who are here to help, share knowledge, and collaborate.
Connect with Us:
Join our Community Chat for real-time discussions and networking opportunities.
Share your experiences and ask questions in the community discussions.
Follow us on GitHub for updates and exciting projects.
Remember, every great coder started as a beginner. Your journey is just beginning, and there's a world of code to explore. Embrace the learning process, keep coding, and never hesitate to ask for help when needed.
We can't wait to see your contributions and achievements in the world of Git and GitHub. Welcome to the community, and happy coding! 🚀


